
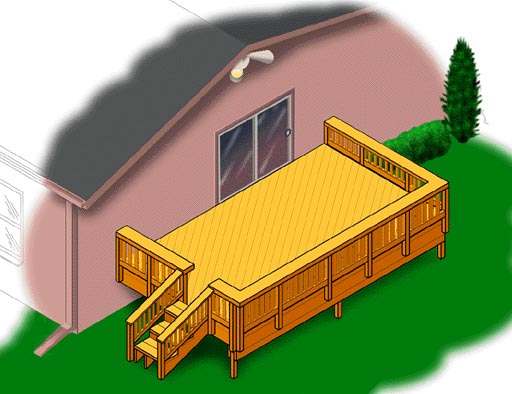
Build a 12' x 20' Attached Patio Deck
Basic, Important Considerations in Planning a Deck Attachment to House
Envision the size you would like and that fits your family's needs. Then measure the house wall on which you plan to attach the deck. Determine the sun, shade, and wind that will affect deck's placement and make plans for any additional enhancements, i.e., latticed cover.
Sketch a plan of the deck with dimensions.Check with your local building department to verify that the design meets all local building codes and requirements. If OK'd, you may pay a fee for a building permit with a time limit. An inspector may visit to examine your construction. This varies from community to community. You may want to review your design with an architect.
Experienced, informed, and helpful Sutherlands personnel will gladly answer any questions. Check our Locations page for store nearest you.Determine railing choices. Railings are mandatory on all decks over two feet high and also recommended on lower decks.Before excavating, call local utilities for underground electric, water, and sewer line locations as well as any dry wells, cesspools, or septic tanks.
Clean away all trees, shrubs, grass, big rocks, and all debris from decksite before you order any material.Even if deck is redwood or cedar, the ground-contact posts are better with pressure-treated lumber.Contact National Weather Service for frost line depth in your area. Use galvanized connectors and nails.Protect your eyes while hammering or using any saws. Wear a dust mask when cutting lumber. Wash hands after handling pressure-treated lumber. Do not burn treated lumber. Observe all safety precautions.
Building Procedures in order:
- Design
- Obtain necessary building permits
- Prepare the site
- Buy the materials
- Layout the footings
- Set the footings
- Set posts and beams
- Install joists
- Nail on decking
- Trim decking
- Install any options, such as railings, benches, latticework, etc.
- Enjoy!
This example Project Plan is for an attached 12'x 20' basic deck, two feet above the ground. These plans are provided for general information only. This is a suggested design and is strictly a preliminary plan, not to be considered a finished building plan. Sutherlands does not warrant the accuracy or completeness of these plans. It is recommended that all dimensions and elements be field verified.
You, as the consumer, contractor and/or builder, are responsible for any interpretation of these plans and for all construction or adaptation in any stage of this project. You are responsible for all necessary bracing and support strength, for all measurements being correct, and for the verification that this design with or without any substitutions or modifications meets all local building codes and requirements. Also be advised that electrical, mechanical, plumbing, structural and other elements may be concealed by existing conditions and this is your responsibility. Sutherlands is available for any questions and will give you the best advice for your individual situation, but without responsibility for your actions.
Dictionary of Terms:- - Joist - Boards that act as bottom support of top, visible planks
- - End Joist - Boards that are on far ends of deck
- - Beam - Boards that sit on foundation supports
- - Ledger Board - Front board for finishing attachment to lateral joists
- - Stringer - End pieces that hold stair steps together
- - Tread - Stepping portion of stair steps
- - Railing Post - Vertical upright lumber that hold rails
- - Guardrail - Lower horizontal board between railing posts
- - Top Rail - Upper horizontal board between railing posts
- - Cap Rail - Top of all posts and pickets running around deck
- - 4x4 Post - Block lumber piece holding beam into concrete footing
- - Concrete Footing - Buried below frost line, varies from 24" to 48"
The following is the basic information for building and attaching a deck to an exterior wall of a house. It is only basic information and is not a full outline of every step required. It does not include the actual attachment to the house so be sure to seek professional advice regarding your house's exterior finish and its placement on your land. Some sizing and cutting of lumber will be required.
It is recommended you acquire complete building plans if you are not familiar with construction, and especially if this is your first major lumber project. Deck Building instruction books are also available for sale at Sutherlands.
- Establish where to position the posts by squaring to the house wall. Mark the house to indicate the width of the deck where it will attach. Set up a string triangulation to determine post positions.
- Use a plumb line and chalk mark the ground at intersections made by string positioning. With posthole digger, make holes a foot across the top that widens to about 16" at bottom.
- Dig to 8" below your frostline. (you've contacted the National Weather Service for your area.)
- Set a 4x4 rail post in one of the holes and position where your strings intersect. Fasten brace and drive a stake into the ground to be able to reach the brace. Repeat for adjacent side of the post.
- When all posts are plumbed, pour concrete into the holes
 . Stop a few inches below the lip of the hole and re-plumb any posts if needed.
 - Concrete must set at least 24 hours before you remove the braces.
- Pack dirt into hole and slope the surface so runoff will be away from the post.
- Mark house with deck floor height. Measure down a distance equal to the thickness of decking, adding the depth of a joist and a beam .
- Fill a water level. You'll need someone to help you to adjust the level so that the water comes to the post-height mark on the house. Mark the post at the height of the water.
- Put a combination square at the post-height mark and draw cutting lines on each side of the post and repeat on each of the posts.
- The post should now be ready for a beam. Set your circular saw to cut two inches deep and position the lower edge of the blade to the post-height mark and cut across one side of the post.
- Repeat on other side of the post and nail a post-and-beam connector to top of post.
- Cut four beam boards the width of the deck and fasten the boards together in pairs. This will form the beams.
- Nail beams with the galvanized common nails in rows of three into both sides of the beam at 16" intervals.
- Bevel bottom corners of each beam by making a diagonal line drawn from the corner.
- Center beams in connectors on the posts and nail.
2. BASIC FOUNDATION OF JOISTS
- Build outer frame by nailing or screwing ledger boards into joist ends.
- You'll need a helper to set the frame on beams. Leave a half inch between the wall and the edge of joists .
- Measure diagonally from house to square the frame.
- Secure the end joists to the beams with galvanized framing connectors.
- Also attach framing connectors to inside the corners to help strengthen the frame.
- Mark ledger boards at 16" or appropriate intervals.
- Align inner joist edge. Put joist hanger flush with bottom of ledger board and nail this side in place.
- Cut all inner joists to length.
- Slide inner joist into joist hangers and secure by holding closed and nailing to ledger board and then to each joist side.
- Because this deck project has a railing, pieces of bridging for reinforcing the end joists may need to be added.
3. FLOORING
- Put down the first boards about l/8" from the house wall and secure with three 3" nails. Attach remaining boards 1/8" apart with one end flush with one edge of the deck .
- Snap a chalk line across all board ends where they are longer than the edge of the deck. Use pre-trimmed board at the house to help position the line at the face of the end joist.
- Using a straight board along the line as a saw guide and trim all the decking with your circular saw. Have the saw set to cut a little deeper than the board thickness.
4. RAILING
- Picket railings add to deck's safety as well as its beauty.
- Draw a line on each post where top of decking will meet. Hammer a large finishing nail halfway into each post above the line where it barely touches. You'll need a helper to hold each post where its weight is resting on the nail so you can drill a half inch hole through the post and the deck frame. Set in a carriage bolt, add a washer and nut onto the end, and tighten assembly so post has just a little "give."
- Nail rails to inside of the posts, flush with the tops and two inches above the deck surface, and secure butt joint corners with three inch nails.
- Secure cap rails to posts and top rails with three and a half inch nails.
- Extend from cap rail underside to lower guardrail bottom and nail to both guardrails with two and a half inch nails.
- Use a 2x4 spare piece of wood as a spacer to achieve a uniformity between railing pickets of no more than four inches wide.
This Sutherlands deck project is measured for two feet above the ground with three steps. The stair steps are extremely important to your deck's safety as well as its appearance. Safety code may require setting the stair steps into concrete footing as with the deck posts or set into a cement slab at the stair step base.
- Planning ahead and measuring carefully is crucial to your deck's outcome.
- Align the measuring tape with decking edge, and with the level resting on the deck, measure actual total rise at end of level.
- Chalk a mark on the ground and measure another fifteen inches out from this mark. If you will need a concrete slab, this is where the front edge will rest.
- For the slab, dig a hole six inches deep, about one foot wider than the steps and thirty inches from front to back.
- Make a rectangular form of 1x4's that will fit in the hole. Level and fill with concrete. Level to top of form.
- Secure stringers to inside faces of deck railing posts with galvanized nails.
- The treads are to fit snugly between the stringers.
- Measuring tape (25 foot recommended)
- Plumb bob
- Posthole digger
- Carpenter's 2' level
- Hammer
- Mortar tub
- Cement trowel
- Wheel Barrow
- Hoe
- Shovel
- Water level
- Circular saw with carbide-tipped crosscut blade
- Framing/Rafter square
- Drill with 1/2" bit
- Adjustable/Crescent Wrench
- Marking Pencils
- Chalk Line
- Safety Glasses